In today's fast-paced world, video consumption has become a popular form of entertainment, resulting in an abundance of video editing applications like CapCut. Music plays a crucial role in video creation, shaping the narrative and enhancing its appeal. Have you experimented with using Apple Music as the background soundtrack for your CapCut videos?
Incorporating background music from Apple Music can enhance the storytelling and captivate your audience. Despite the format differences, it's possible to merge these two platforms seamlessly. If you've ever wondered how to add your favorite Apple Music tracks to your CapCut creations, we've got you covered. Let's explore the simple yet effective methods for adding Apple Music to CapCut and elevating your video editing game.

Part 1. How to Get Apple Music on CapCut?
CapCut offers an extensive selection of free background music, providing users with a wide range of options. While utilizing CapCut's music library is advantageous, some may prefer to incorporate tracks from platforms like Apple Music. To integrate your favorite Apple Music songs into CapCut, it's crucial to understand the audio formats supported by CapCut, which include MP3, WAV, M4A, and FLAC. Given that Apple Music content is DRM-protected, a robust Apple Music converter such as TunePat Apple Music Converter is recommended to convert your desired Apple Music files into compatible audio formats.
This software is purpose-built to transform Apple Music into MP3, WAV, FLAC, and various widely used formats at up to 10x speed. Following the conversion, you can seamlessly import music from Apple Music into CapCut Video Editor or any other platform and device. Additionally, the conversion process preserves the original metadata and lossless Hi-Res audio quality of Apple Music tracks, ensuring a flawless transfer. This allows you to effortlessly integrate Apple Music into CapCut for your video projects.
TunePat Apple Music Converter
TunePat Apple Music Converter helps you download and convert all Apple Music songs and playlists to MP3 and other common formats.
Step 1 Choose the Convert Option
By default, when you activate TunePat for the first time, it will open the Web option and pop up an Apple Music web player. If you want to choose the App option, click "Switch to App" on the main interface. If you are not sure which one to choose, here are the differences:
Record music from App: You can download Apple songs, podcasts, iTunes M4P music files, and Audible audiobooks using the iTunes app. On Mac, this option supports Hi-Res sound quality at a rapid conversion speed, while maintaining the original sound quality on a Windows computer.
Record music from Web: Alternatively, you can explore and download songs and podcasts using the built-in Apple Music web player at up to 10x speed, preserving the original sound quality.
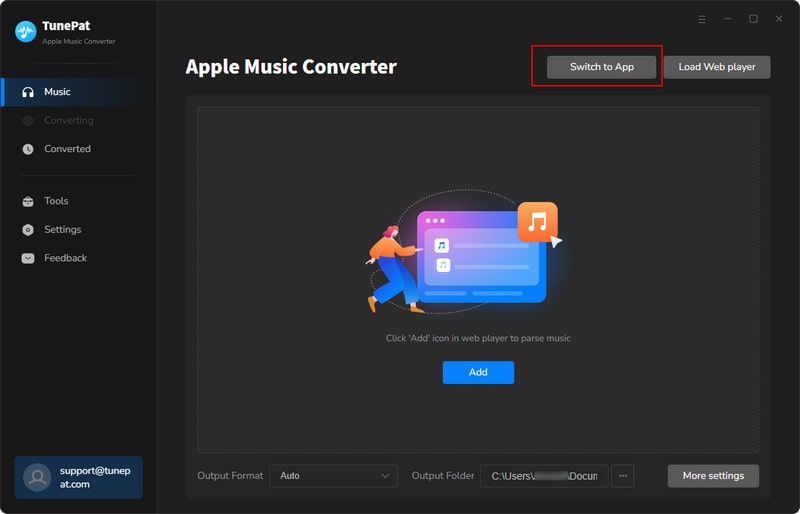
Step 2.1 Record Apple Music from Apple Music Web Player
If opting for the Web option, you don't have to take any extra action and you will be presented with the the built-in Apple Music web player when you activate TunePat. Simply select the music you want to download, click on the "Click to add" button to load the songs, and manually choose the specific songs you like. Click the "Add" button to add these selected songs to the conversion list.
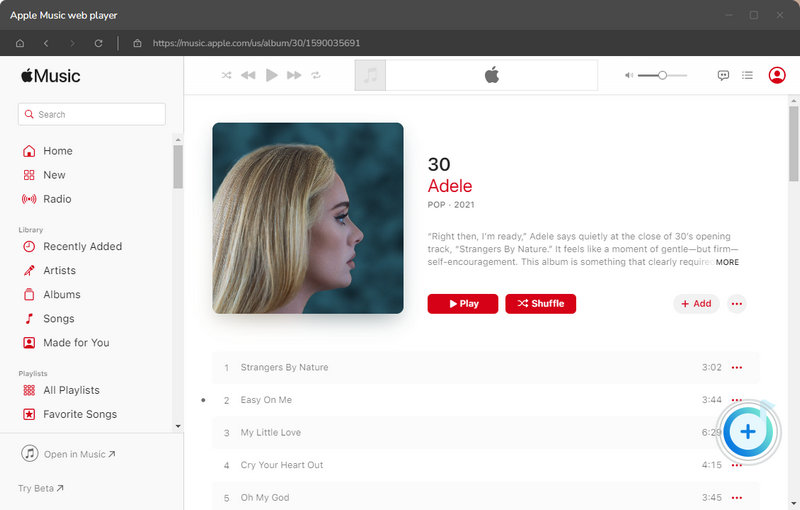
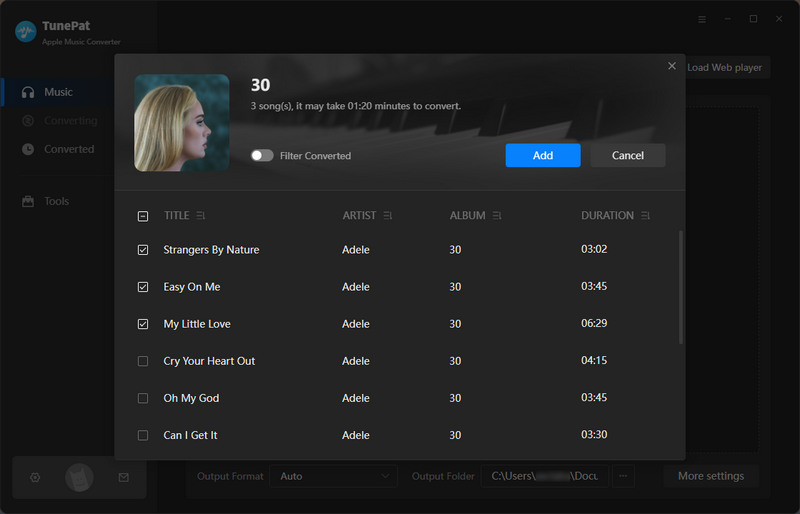
Step 2.2 Record Apple Music from iTunes App
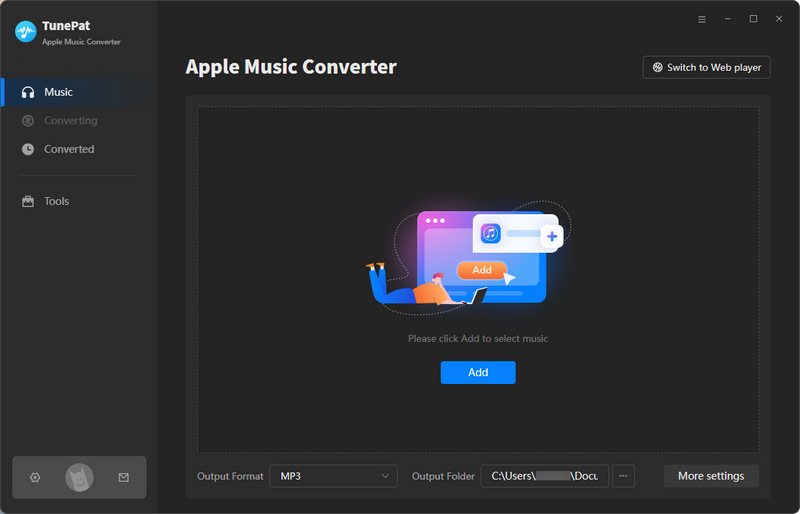
If choosing the App option, make sure you have iTunes on your computer and it will be automatically activated when you select this option. By clicking the "+ Add" button, a pop-up window will appear, displaying a list of music from your iTunes library. Or you can drag and drop Apple Music songs directly into TunePat.
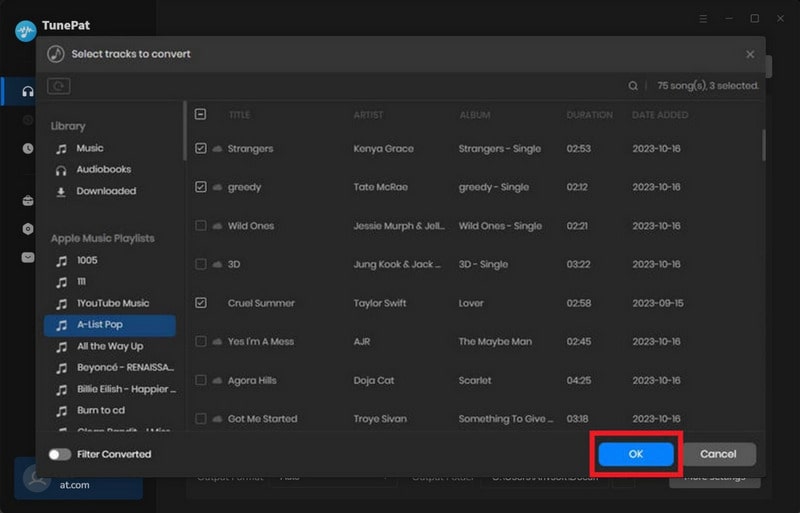
Select the desired songs for conversion from iTunes and click "OK". TunePat will then load the chosen songs quickly.
Step 3 Set Up the Output Parameters
Navigate to the "Settings" menu located in the lower left corner to customize the conversion mode, output quality, file name, and sorting method. To add Apple Music to Capcut, you can choose "MP3, WAV, or FLAC" as the output format. Here we select "MP3" as an example.

Step 4 Start Download Songs from Apple Music
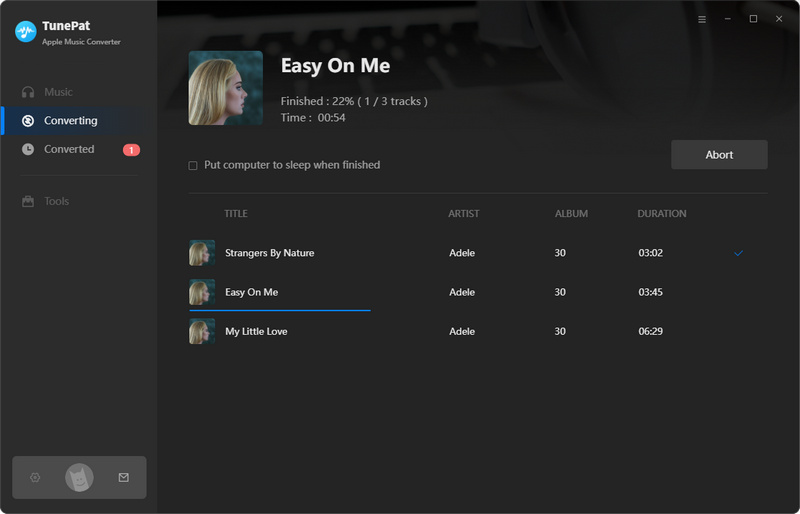
Once you're back in the "Home" section, you can start downloading Apple songs to your computer by selecting the blue "Convert" button. If you want to add more tracks, just click on the "Add More" button and choose songs from other albums or playlists.

TunePat operates at a very rapid download speed so please be patient until the conversion process finishes.
Step 5 View the Converted Apple Music
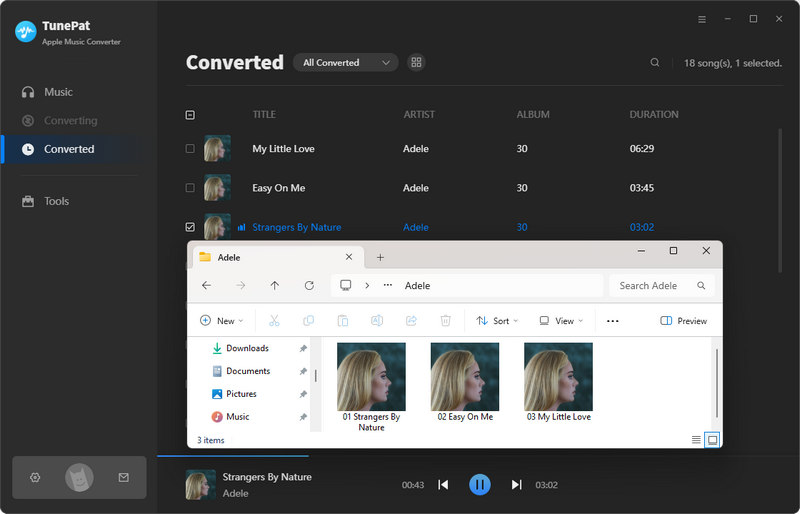
When the conversion is complete, the download folder will automatically open. If not, you can activate it manually through the "Converted" option > the "file icon" next to any converted music.
Part 2. How to Add Apple Music to CapCut on a Computer?
Following the aforementioned steps, you must have transformed Apple Music into standard MP3 audio files and saved them on your computer. These files are compatible with CapCut, allowing you to seamlessly incorporate them into your CapCut videos. Whether you're using CapCut or other platforms, importing Apple Music is a straightforward process with TunePat. If you're using a computer, you can opt for CapCut's desktop application or access it via their website. Continue reading the tutorial below to master using Apple Music on CapCut via your computer!
Add Music from Apple Music to CapCut on Desktop
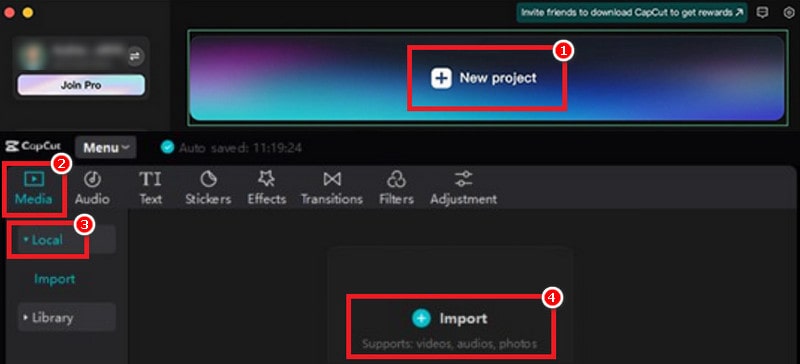
Step 1 Open your CapCut desktop app on your computer, and click "New project".
Step 2 Select "Media" > "Local" > "Import" and find the file folder that stores all the downloaded Apple Music.
Step 3 Pick one of them, and click the blue plus button on it, or just drag it to the workspace in the tracks area.
Add Music to CapCut from Apple Music on the Web
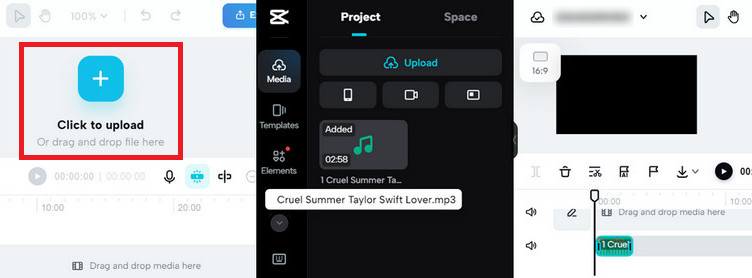
Step 1 Open one web browser, head to "https://www.capcut.com/editor", and log in to your account.
Step 2 Click the "Click to upload", find the file folder that stores all the downloaded Apple Music, and open the music you want. Or you can just click the file icon of the music in TunePat and drag the file to CapCut.
Part 3. How to Add Apple Music to CapCut on a Mobile Device?
CapCut is also accessible on Android and iOS, offering advanced creators essential tools like 4K export, keyframes, color grading, and curve speed to enhance video production efficiency. After converting Apple songs, integrating Apple Music into CapCut as a background track on mobile devices is straightforward. Before that, you need to transfer the downloaded Apple Music from your computer to your mobile device.
Transfer Apple Music to Your iOS Device
Step 1 Launch the iTunes app on your computer, and navigate to "iTunes" > "File" > "Add File / Folder to Library". Choose a music file or folder. Or you can just click the file icon of the music in TunePat and drag the file to iTunes.

Step 2 The Apple Music downloads will appear in the "Recently Added" tab. Connect your iPhone or iPad to your computer, and click on the device icon located at the top left. In the "Settings" section, select "Music".
Step 3 Check "Sync Music" to sync the entire music library, and click "Apply". They will be on the Music app.
Transfer Apple Music to Your Android Device
Step 1 Link your computer to your Android phone, and access the storage of your Android phone.
Step 2 Transfer the Apple Music files or folder to your Android phone storage by copying & pasting or using drag & drop. After that, you can open the Files app to verify the presence of the Apple Music files.
Add Apple Music to CapCut on Mobile
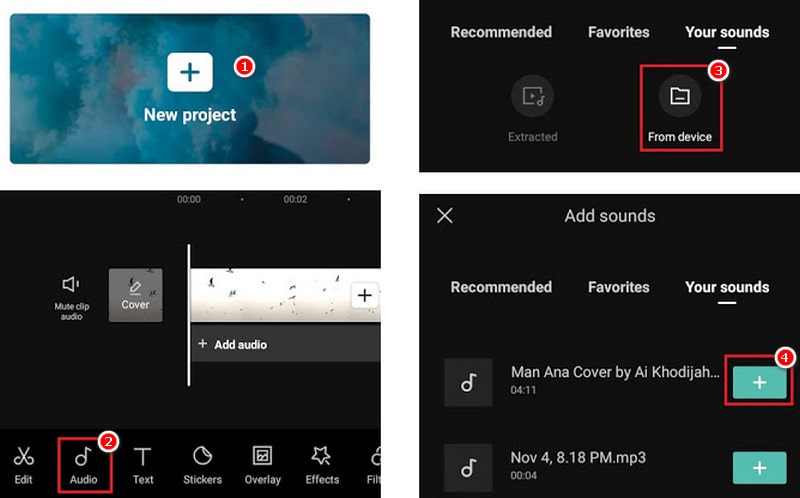
Step 1 Open CapCut Video Editor on your mobile device and select the "New Project" option.
Step 2 Once your project is created, navigate to the editing window and tap the "Audio" icon located at the bottom.
Step 3 Choose the "Sounds" option and proceed to the "Your Sounds" section to locate the Apple Music downloads. Then tap the plus icon to insert your chosen music into the video.
Part 4. Some FAQs You Might Want to Know
1. Which media file types does CapCut support?
CapCut supports audio formats such as MP3, WAV, M4A, FLAC, WMA, and more. In terms of video, it accepts formats like MP4, WMV, MOV, and others. Additionally, it supports image formats including JPEG, GIF, TIFF, and BMP.
2. Is there any limitation of CapCut?
Yes, CapCut enforces a 15-minute restriction, suitable for crafting shorter content or material tailored for shorts. If you aim to produce content exceeding this duration, you can consider exploring alternative video editing software.
3. Is CapCut free to use?
Yes, CapCut is a free all-in-one video editor and video maker application with everything you need to create high-quality videos. It's available on both Android and iOS devices. Yet, there are watermarks in the ending and templates of its video editing.
4. How to make a velocity edit on CapCut?
To start, open CapCut and select "New Project". Choose your desired video from your gallery, trim it, and mute its original audio using the "Mute" button. Next, tap "+Add audio" to add your Apple Music downloads. Access the "Beats" tool by tapping on the audio and dragging the bottom menu to the right. Finally, export your video by clicking the upward-facing arrow.
Conclusion
Creating captivating videos requires compelling background music. You now have the know-how to seamlessly import Apple Music into CapCut Video Editor. Utilize TunePat Apple Music Converter to effortlessly address this issue in just a few clicks. Apart from CapCut, this versatile converter enables you to incorporate and utilize Apple Music tracks in Canva, iMovie, TikTok, and other leading video editors without limitations. Don't hesitate—leverage your creative skills to craft exceptional videos in CapCut today!

Delilah Rene
Senior Writer