Apple Music is one of the most popular streaming services worldwide, but many users find its sound a bit monotonous and want more control. Although it offers a built-in equalizer, its features are quite basic, which leads many to ask: What is the Best EQ for Apple Music? To find the best EQ for Apple Music and customize your music, using a third-party equalizer app can bring significant improvements. And if you’d like to enjoy your favorite songs offline without restrictions, downloading Apple Music to your local devices is the best option. In this guide, we’ll show you how to use Apple Music’s EQ, explore the top third-party tools, and download Apple Music for unlimited offline playback.

Part 1: How to Use Apple Music’s Built-in EQ
Apple Music offers a built-in EQ feature that enables users to fine-tune the audio output by selecting from various preset modes. While it doesn’t provide the flexibility for professional equalizers, it can still enhance your listening experience if you know how to use it properly. In this section, we will guide you on how to use the EQ on different devices and also highlight its main limitations.
Part 1.1 What is the Best EQ for Apple Music?
| Preset | Best For |
|---|---|
| Bass Boost | Hip-hop, EDM, Pop, Dance |
| Vocal Clarity | Podcasts, Audiobooks, Acoustic, Classical |
| Balanced | Mixed genres, everyday listening |
| Treble Boost | Rock, Jazz, Instrumental, Live music |
| Loudness | Low-volume listening, background music |
Part 1.2 Change EQ Settings for Apple Music on iPhone, iPad, Windows, and Mac
On iOS (iPhone or iPad)
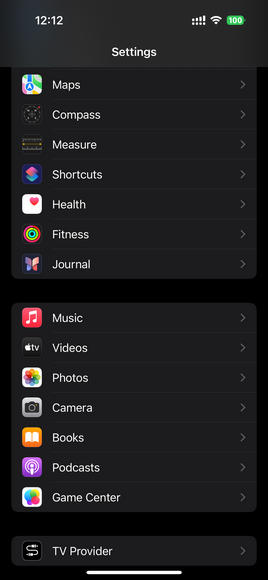
Step 1 First, go to Settings on your iPhone or iPad. Scroll down and find "Music".
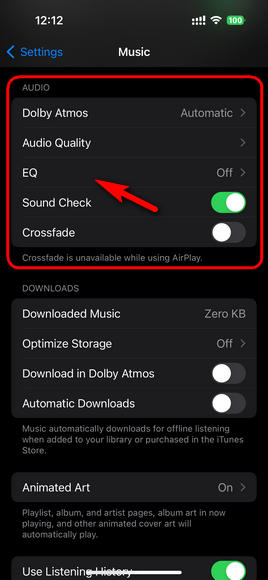
Step 2 Under the "Audio" section, find the option labeled "EQ".
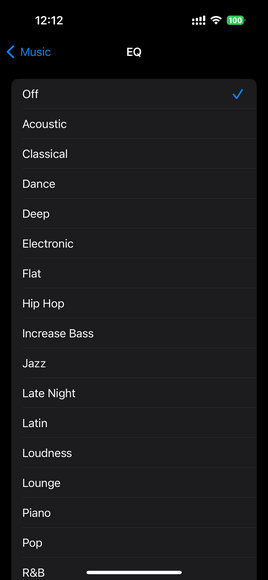
Step 3 Tap it, and you will see a list of preset modes (e.g., Acoustic, Classical, Late Night). Select the one that matches your preference.
On Mac
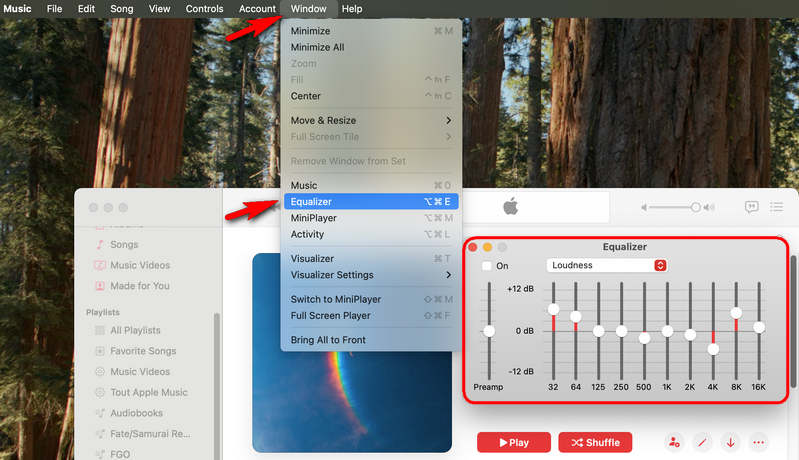
Step 1 Open the Music app on your Mac computer.
Step 2 From the top menu, click "Window" > "Equalizer".
Step 3 Here, you can choose from preset EQ options or slightly adjust the sliders if available, depending on your macOS version.
Step 4 Once selected, the EQ setting will apply to all playback in the Music app.
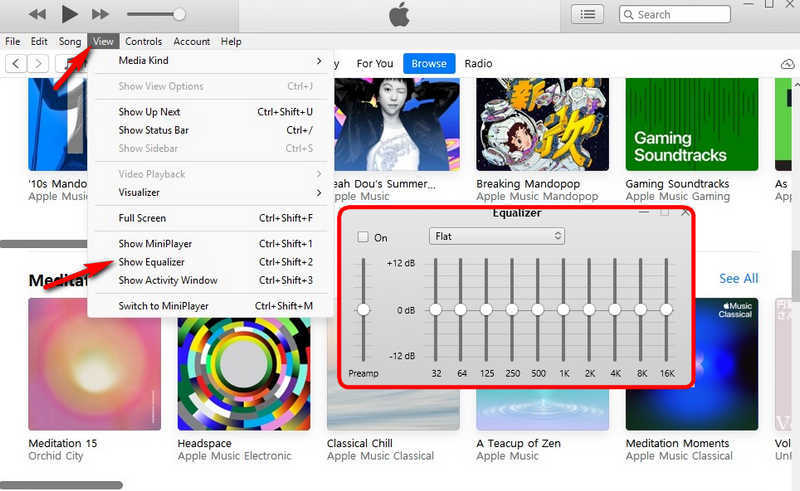
On Windows (iTunes App)
Step 1 Open iTunes and start playing any track.
Step 2 In the top menu, click "View" > "Show Equalizer".
Step 3 At this point, you can modify it manually or choose a preset mode. It will automatically apply when you restart iTunes.
Part 1.3 The Limitations of the EQ for Apple Music
While the EQ can be helpful for quick audio adjustments, it comes with several drawbacks.
- Lack of Customization
- Limited Control
- Inconvenient to Use
- Inconsistent & Non-Adaptive
The EQ settings are applied to all Apple Music tracks. There's no way to fine-tune them for a specific song or genre.
Offering only preset modes and with no ability to manually adjust frequencies, it might not satisfy demanding listeners.
Compared to Spotify, changing the EQ during playback is more cumbersome. It can only be done in the settings, not within the Music app.
Performance varies by device and may conflict with Bluetooth headphones with built-in equalizers.
Want to download Apple Music and play it offline permanently? Then, try the TunePat Apple Music Converter. It can download Apple Music tracks, playlists, albums, and iTunes Music to your computer so that you can play them without restrictions.
Part 2: Top Third-Party EQ Tools for Apple Music
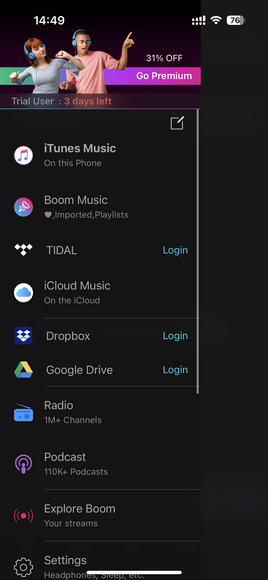
1. Boom: Bass Booster & Equalizer for iPhone & iPad
Boom is a music player app focused on enhancing audio effects. It supports Apple Music, Tidal, local files, and cloud music services. Compared to the built-in EQ for Apple Music, Boom offers multi-band EQ, 3D surround sound, and bass boost, allowing users to freely adjust and save custom audio presets, providing a more powerful and personalized listening experience even on standard headphones.
Step 1 Visit the App Store on your iPhone or iPad and search for "Boom: Bass Booster & EQ." Download and install it on your device.
Step 2 If it is your first time using Boom, the app will prompt you to allow access to your Apple Music library. Select "Yes" to allow access.
Step 3 On the Boom home screen, you'll see multiple music sources. Tap "Apple Music" and sign in with your Apple ID to authorize it. Then, search or browse your playlists in Boom, select a song, and tap "Play." This will play the audio through Boom's sound processor instead of the native Apple Music player.
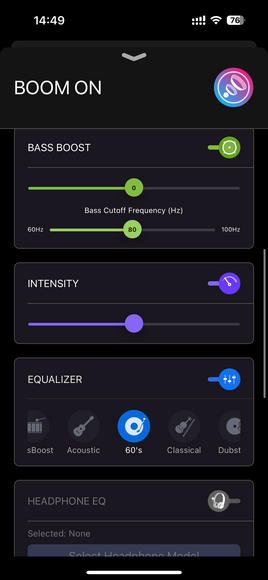
Step 4 There's an EQ button at the bottom of the playback screen. Tap it to access the equalizer settings. You can choose from preset EQ modes or manually adjust the EQ by sliding the control bar for each frequency band.
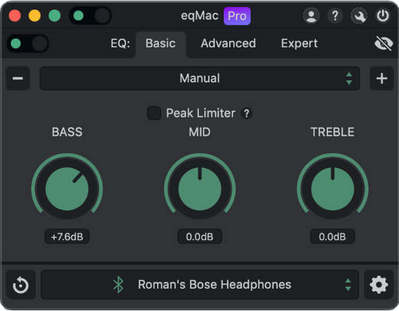
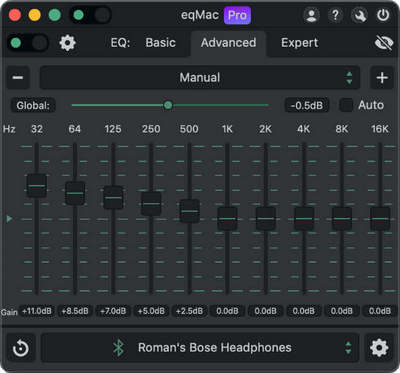
2. eqMac for Mac
eqMac is an equalizer app for Mac that lets you adjust the sound of Apple Music on your computer. Unlike the built-in EQ for Apple Music, which only offers presets, eqMac gives you more control. You can freely adjust bass, mids, and treble, and save your sound profiles to quickly switch between different headphones or speakers.
Step 1 Go to the official eqMac website and download the installer. Drag the app into your Applications folder. The first time you open it, eqMac will ask you to install an audio driver. Don’t worry. This is the official driver, and installing it is necessary for the app to work properly.
Step 2 Switch System Audio to eqMac, which should usually happen automatically. If not, go to "System Settings" > "Sound" > "Output" and select eqMac. After that, choose the headphones or speakers you want to use inside the eqMac app. From now on, all audio will be processed through eqMac.
Step 3 Play a song in Apple Music and adjust the volume or EQ in eqMac to see how it affects the sound.
Step 4 eqMac offers ready-made presets such as Rock, Pop, and Classical. You can also fine-tune the bass and treble sliders yourself to find the sound you like best. Once you discover a setting you enjoy, save it as a profile so that next time you switch devices, you can load it instantly without starting from scratch.
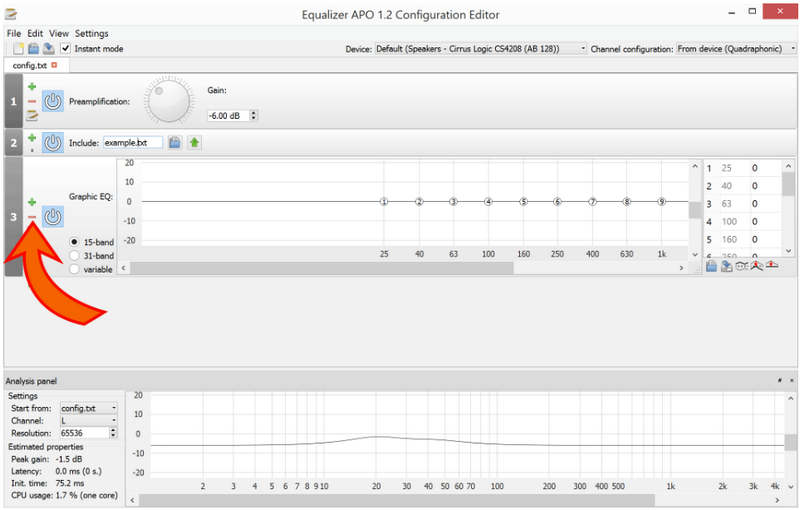
3. Equalizer APO for Windows
Equalizer APO is a free equalizer for Windows that works directly at the system level. In simple terms, this means it can change the sound of everything on your computer, not just Apple Music, but also Spotify, YouTube, or even your local music files. Compared to the built-in EQ for Apple Music, Equalizer APO gives you much more freedom to tweak bass, mids, and treble exactly the way you like.
Step 1 Go to the official Equalizer APO page, download the latest version, and install it on your PC. During setup, you’ll be asked to select the audio device you want to use EQ with, your speakers or headphones. Once the installation is complete, restart your computer so the changes take effect.
Step 2 After installation, you'll see a tool called "Configuration Editor" in the Start menu. This is the control center for Equalizer APO, where you can adjust your sound effects.
Step 3 Click the green "+" button in the upper-left corner. Select "Basic filters" > "Graphic EQ". A row of sliders will appear, which you can drag to adjust the value.
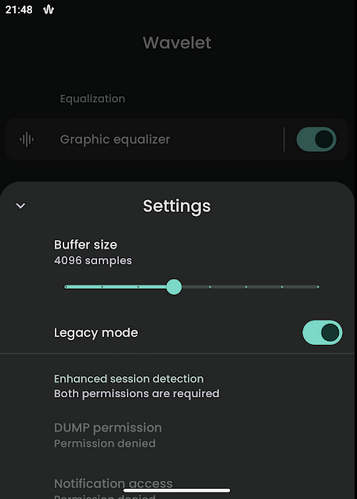
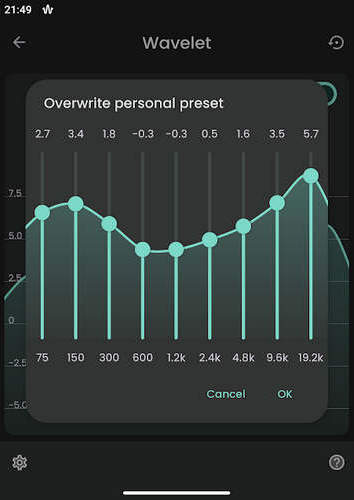
4. Wavelet for Android
Wavelet is an Android audio enhancement and equalizer app, designed especially for headphone users. In addition to a standard multi-band EQ, it features AutoEQ, which automatically adjusts the frequency response based on your headphone model to match the manufacturer’s reference sound. Wavelet also provides bass boost, virtual surround, EQ presets, and custom adjustments, making it ideal for anyone seeking higher-quality sound.
Step 1 Open the Google Play Store, search for Wavelet, and install it. The first time you launch the app, grant it the necessary media playback permissions so it can process your audio.
Step 2 Wavelet will automatically recognize your connected headphones. Tap your headphone model from the list. If AutoEQ supports your model, you’ll be able to apply the AutoEQ curve instantly.
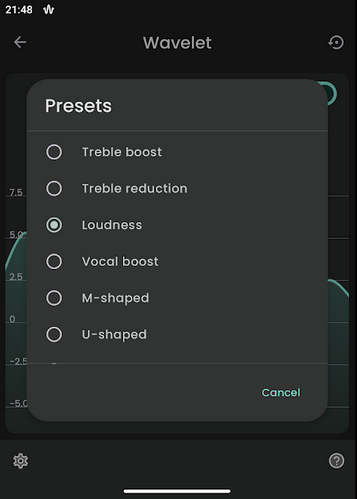
Step 3 Tap "Graphic EQ" to access the equalizer panel, which can range from 10 to 31 bands depending on your settings. You can pick a preset such as Treble boost, Treble reduction, Loudness, or Vocal Boost, or manually drag the sliders to shape the bass, mids, and treble. For example, lifting the treble can make vocals clearer, while boosting the bass gives more punch to drums.
Step 4 After adjusting, save the preset and give it a name for different headphones or listening scenarios. Later, you can quickly apply the preset with one click.
Part 3: How to Download Apple Music for Offline Playback
While exploring how to adjust the EQ for Apple Music, we also found that many EQ tools support local file playback. This naturally raises a question: do you want to save your Apple Music tracks locally so you can continue adjusting the EQ even after your subscription ends? Since Apple Music files are protected by DRM, you’ll need a reliable solution like TunePat Apple Music Converter to make this possible.
TunePat Apple Music Converter is a tool that lets you download and convert Apple Music tracks, albums, playlists, and audiobooks into plain audio formats like MP3, AAC, WAV, FLAC, AIFF, or ALAC. With it, you can keep your Apple Music permanently, even after your subscription ends, and play them on any device without restrictions. It preserves the original audio quality and keeps ID3 tags.

TunePat Apple Music Converter
TunePat Apple Music Converter helps you download and convert all Apple Music songs and playlists to your local computer for offline listening.
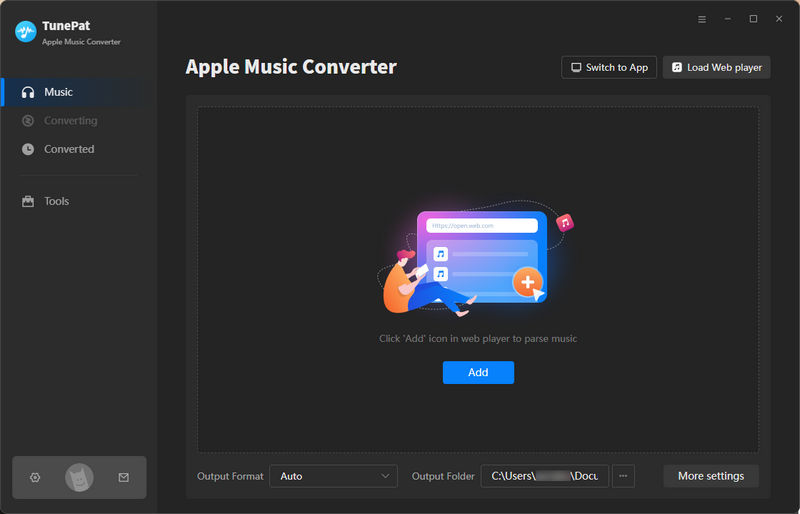
Step 1 TunePat is a desktop application available for both Windows and Mac. Click the download button above to get it on your computer. Once installed, launch the program, and you will see the main interface. With TunePat, you can download Apple Music either from the built-in Apple Music web player or through the iTunes/Music App. To change the audio source, simply click the "Apple Music web player" button. For detailed instructions on converting via iTunes/Music App, please refer to the TunePat Apple Music Converter User Guide.
Step 2 Next, click the settings icon to open the settings panel. Here, you can adjust options such as Conversion Mode, Output Format, Bit Rate, and Sample Rate, as well as specify where the downloaded Apple Music files will be stored.

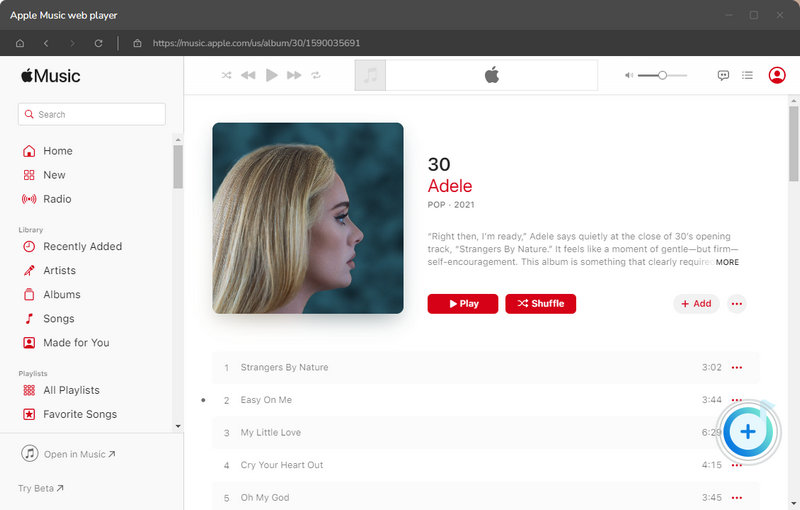
Step 3 After that, browse for the albums or playlists you want. Click the blue button in the lower-right corner, and TunePat will display a list of the available tracks. Select the songs you’d like to download, then click "Add" to include them in TunePat.

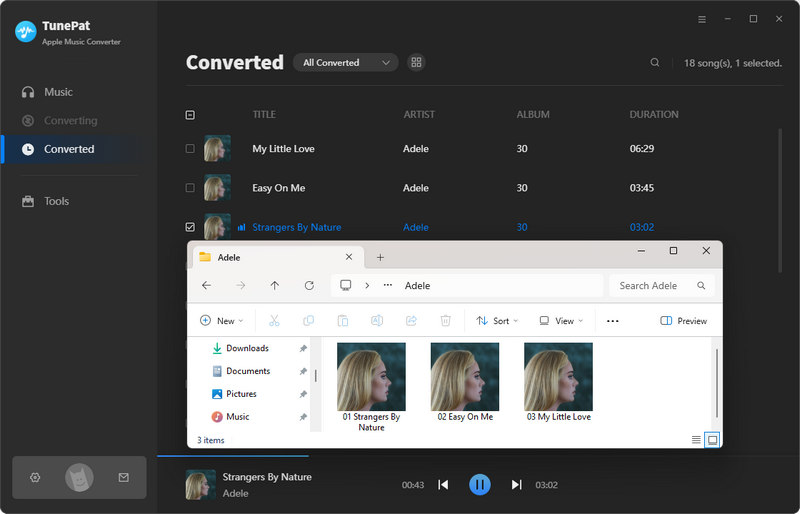
Step 4 To add more songs, click "Add More" and repeat the same process. Once everything is ready, hit "Convert" to begin the conversion. Wait a moment, and TunePat will complete the task. The output folder will open automatically, or you can check your converted files under the "History" tab.

Conclusion:
While Apple Music’s built-in equalizer offers preset modes for simple sound adjustments, it can feel limited for listeners who want more customization. Fortunately, third-party apps like Boom, eqMac, Equalizer APO, and Wavelet provide more powerful tools to fine-tune the audio exactly the way you like. And if you’d like to keep your Apple Music permanently and enjoy it offline anytime, TunePat Apple Music Converter is the ideal choice. With these tools and tips, you’ll have complete control over your Apple Music experience, whether it’s refining the sound quality, boosting the bass, or building your offline music library.


Olivia Anderson
Senior Writer