OBS Studio is a free and open-source software that serves a variety of users, from avid gamers to educators and businesses, making it suitable for almost any live-streaming task. At its core, it provides a powerful platform for video recording and live streaming, allowing users to stream their videos or broadcasts to popular platforms like YouTube, Facebook, and more.
OBS Studio enables users to seamlessly capture video from various sources, including computer screens, webcams, and external devices. Some users need to play music during their livestreams, and Spotify, with its extensive library of over 100 million tracks, 5 million podcast titles, and 350,000 audiobooks, is the top choice for playing music. However, many people don't know how to play Spotify music on OBS during a live stream. This is the issue that our article today will address.
Method 1: How to Play Spotify Music on OBS via Windows Capture?
To play Spotify music on OBS Studio via Windows Capture, you'll need to capture the Spotify window. Here's how you can do it:
Step 1 Ensure you have the Spotify desktop app installed on your computer. If not, download and install it from the Spotify website, then log in to your Spotify account.
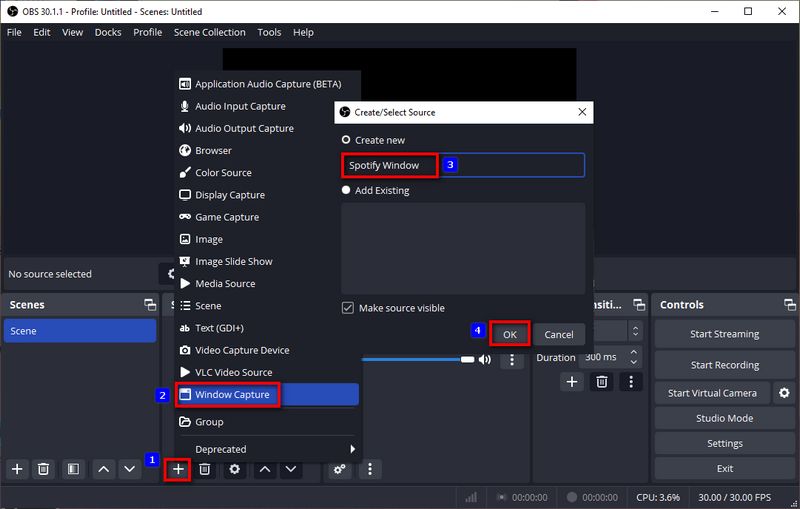
Step 2 Launch OBS Studio on your computer. In OBS Studio, navigate to the scene where you want to add Spotify music. Click the "+" button under "Sources" in the bottom left corner of the screen.
Step 3 From the list of available sources, choose "Window Capture". This option allows you to capture the content of a specific window on your computer. Open the Spotify desktop app and start playing your desired music or playlist.
Next, you need to give the window capture source a descriptive name, such as "Spotify Window". Once you've named it, click "OK". Then you'll see the Properties for 'Spotify Window'.
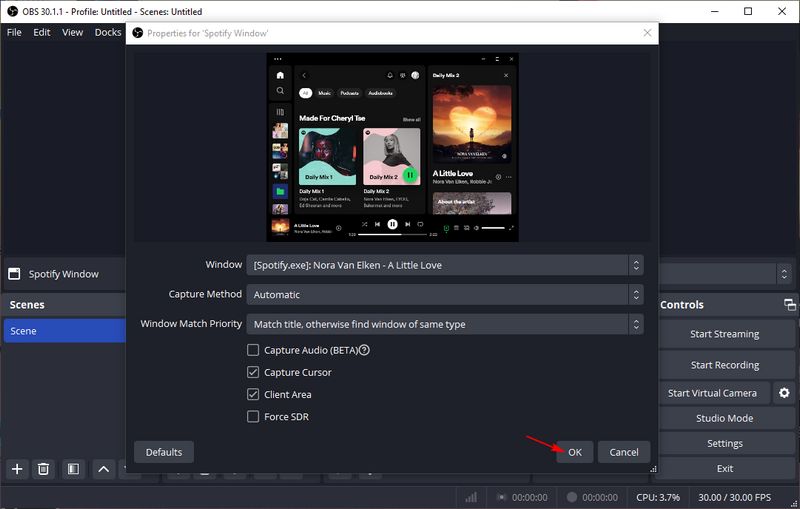
Step 4 In the Window section, please choose an option starting with [Spotify.exe], and then click "OK" to load it.
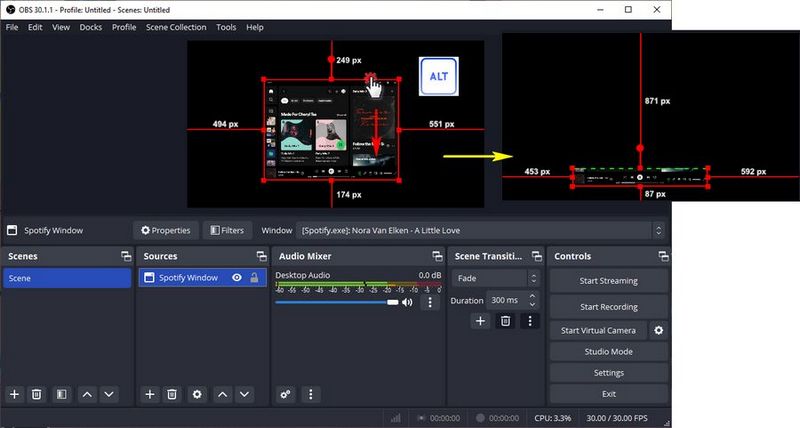
Step 5 If you want the added Spotify window to overlay your original content, you can crop or resize the window accordingly. Simply press Alt on your keyboard, then move your mouse to the window's border to adjust the Spotify application to display only the current song information.
While capturing the Spotify window directly to add it to OBS for playback is relatively easy to accomplish, there are some considerations you need to keep in mind. For instance, for free users, Spotify's streaming comes with certain limitations, including the inability to skip tracks at will and the presence of annoying advertisements. Surely, this is not something your channel's audience would want to hear, and it can be quite embarrassing. To address this issue, free-tier Spotify users may have to consider upgrading to Premium.
However, even for Spotify Premium users, there are still potential issues. As you may know, most songs on Spotify are copyrighted. Playing them on OBS could result in copyright warnings from streaming platforms and potentially lead to your channel being temporarily banned. To avoid these risks, it's advisable to use royalty-free music or obtain licenses for copyrighted music. This is where OBS's built-in functionality to support importing local media files becomes useful.
Unfortunately, even as a paying Spotify user, the local files you have access to are essentially cached files meant for use by the Spotify app when offline. In other words, these files are in a special format and cannot be played on any other program outside of the Spotify application. However, there's no need to worry. In the next section, we'll introduce the ultimate solution. Users can use a reliable third-party tool to download their favorite Spotify songs to their local device, allowing them to use them anytime without an internet connection. Moreover, this method is also very friendly to Spotify Free accounts, as the tool will help filter out ads.
Method 2: How to Use Ad-free Spotify Music Tracks Offline on OBS?
To export Spotify locally and save it in a regular format, we need to choose a powerful converter, and TunePat Spotify Converter is the best choice. As a professional, efficient, and user-friendly audio converter, TunePat Spotify Converter can help users batch-convert and export Spotify's audio content, including but not limited to music, playlists, and podcasts, at speeds of up to 10X. Compared to some free online Spotify downloaders, TunePat Spotify Converter supports a variety of output formats and customizable parameters and can also preserve the audio quality at 320 kbps and ID3 tags.
Once you have downloaded Spotify locally, you can use the features in OBS Studio to import your favorite songs, making it easier to share your favorite music with your audience during live broadcasts. You don't have to worry about unexpected situations such as being unable to connect to Spotify or copyright issues affecting playback. Next, we will specifically introduce how to obtain Spotify local music files and play them offline on OBS.
TunePat Spotify Converter
TunePat Spotify Converter enables users to convert and get Spotify songs, albums, playlists, podcasts, radio, and audiobooks from the Spotify app or web player and then save them permanently.
Step 1 Install and open TunePat Spotify Converter. You can choose to get songs from the Spotify app or the embedded Spotify web player. If you want to get 320 kbps Spotify songs, it's recommended that you choose music from the app. Regardless of the source, you'll need to log in to your Spotify account as instructed on the screen, whether it's Premium or Free.

Step 2 Once logged in, you can smoothly browse your Spotify library. Before selecting songs for conversion, click on the "Settings" tab at the bottom left corner of the program to customize output and conversion parameters in this module. There are many parameters you can set yourself, such as output format, bitrate, and sample rate. Generally, "MP3" is chosen as the output format for its smaller file size and universality.

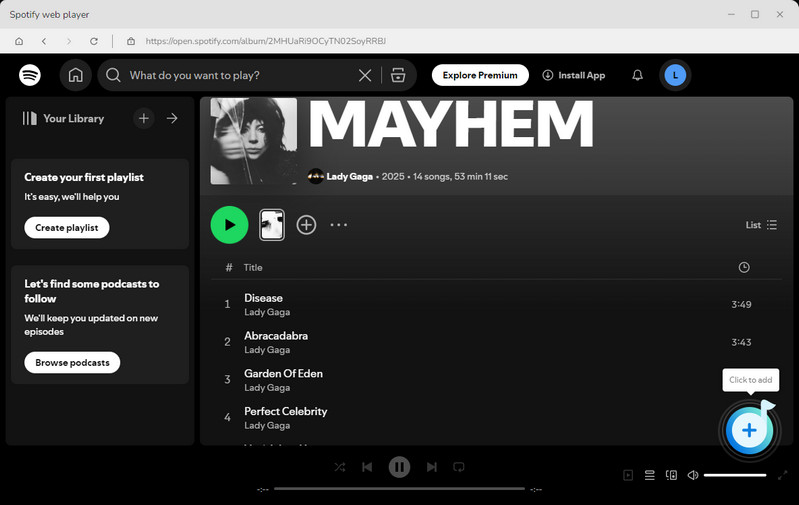
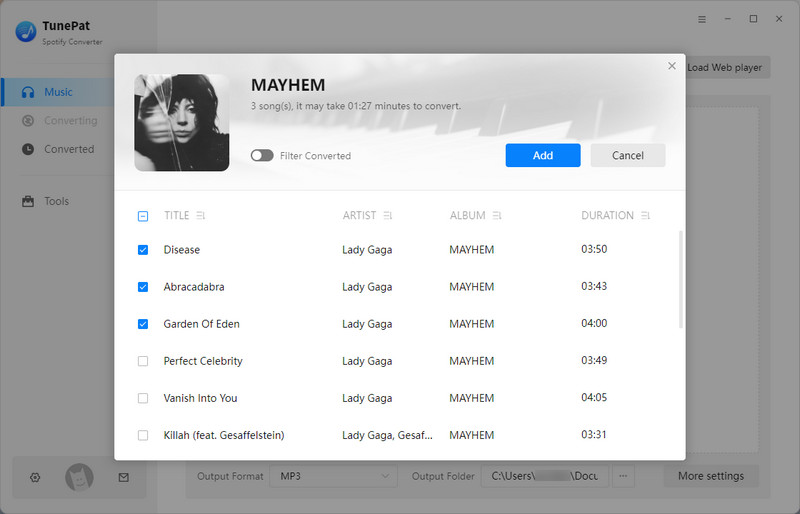
Step 3 After completing the settings, return to the Spotify app or web player window, then open the song you want to convert. Click the "+" button at the bottom right corner, and TunePat Spotify Converter will start parsing automatically. The parsed content will then be displayed in a pop-up window, with all items selected by default.
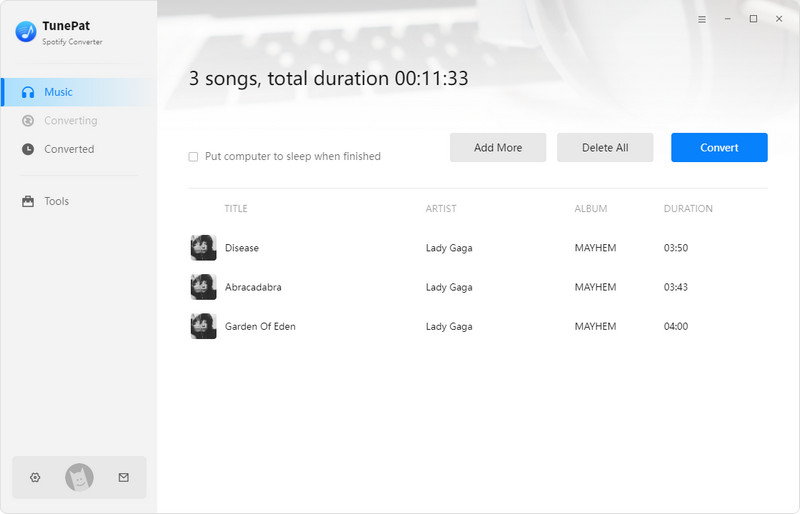
Step 4 You can deselect titles that you don't need as per your requirement, then click "Add" to proceed to the next step. In this step, there are two buttons: click "Add More" to continue selecting other songs for batch conversion, or click "Convert" to start the conversion process immediately.
Once the conversion is complete, you can view or play the converted Spotify songs in the "Converted" module or in the local folder.
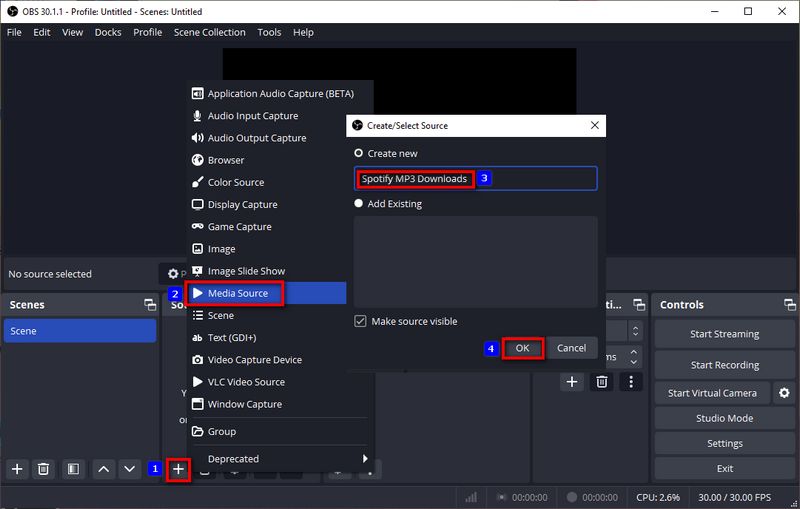
Step 5 Now, you can launch OBS Studio on your computer. Click the "+" > Media Source" under the Sources window. In the pop-up window, Enter a source name under the Create new tab, such as "Spotify MP3 Downloads". Click "OK".
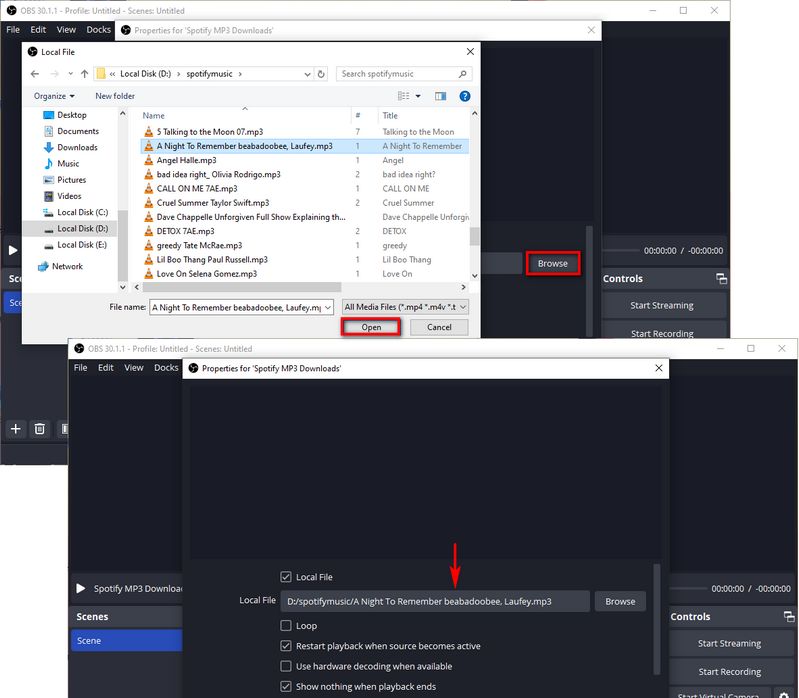
Step 6 Click the "Browse" button to browse and select the recently converted Spotify songs. If you want the music to loop, select "Loop". Then click "OK".
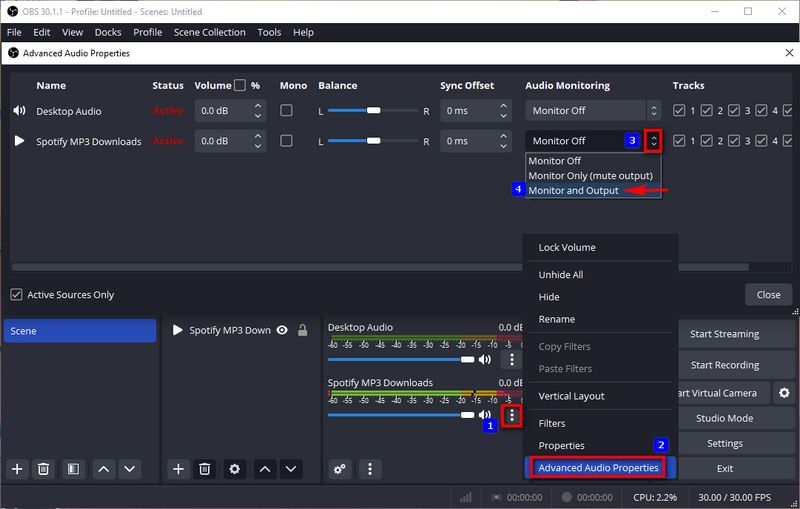
You will see a new media source named "Spotify MP3 Downloads" displayed in the Sources window. Click the "three-dot" icon next to it. From there, you can enable the "Monitor and Output" option from the "Advanced Audio Properties" window. Now you can hear Spotify music audio on OBS during playback.
Conclusion
In this article, we have introduced two methods for adding Spotify music to OBS for playback, with the former being simpler and more direct. However, considering factors such as ad interference in free accounts and copyright issues with certain songs, we also provide an alternative and more versatile method: using TunePat Spotify Converter to export your favorite Spotify songs in a standard format, which can then be imported into OBS for use.
This way, you can obtain Spotify audio in a regular format. These Spotify local files have a wide range of uses; besides importing them into OBS, you can also use them in various DJ software, video editing software, etc. What are you waiting for? Click the "Download" button to get started right away!

Olivia Anderson
Senior Writer