Many users have asked how to save Apple Music to SD card. Why? There are two key reasons. First, while modern phones offer ample storage, over time, accumulating apps, audiobooks, videos, and photos can slow down or even overwhelm your device. Offloading music to an SD card helps free up space and keeps your phone running smoothly.
The other aspect is that if you have a playlist, album, or artist that you like, you'll want to save all your favorite music from Apple Music to the SD card and keep it handy. But how exactly can you save Apple Music to an SD card? Is it even possible, given Apple's notorious restrictions? No need to worry, this article today will solve your worries once and for all. In this comprehensive guide, we'll explore the ins and outs of saving Apple Music to SD cards, covering methods for both Android and iOS users.

Part 1: How to Save Apple Music to SD Card? (For Android Users)
Apple has been working for years to grow its media business, and Apple Music is a big part of that effort. Unlike many of Apple's products, Apple Music isn't limited to Apple devices. It’s also available on Android. This broader access has helped Apple attract more users and expand its reach beyond just iPhone and Mac owners.
Apple Music supports both iOS and Android, and in 2016, Apple added a helpful feature just for Android users: the ability to download songs to an SD card. This means if your Android phone has a microSD slot, you can save music directly to the card and free up space on your phone. On the other hand, iOS users can only save downloaded songs to their device's internal storage, as Apple hasn't yet allowed external storage support.
Next, let's start with how to save Apple music to SD card on an Android phone.
Step 1 If you don't already have the Apple Music app on your phone, head to the Google Play Store to download the latest version.
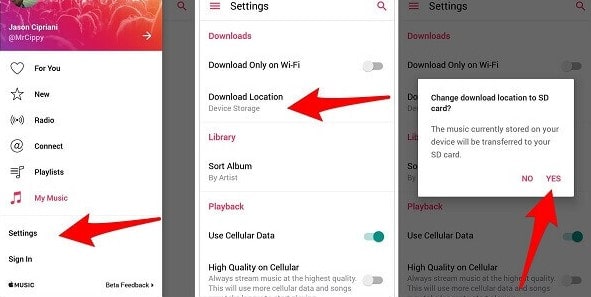
Step 2 Open Apple Music, then go to "Settings > Download Location".
Step 3 Select the "SD card" option from the pop-up list and click "YES" to confirm the action.
From this point forward, any new songs you download from Apple Music will be saved to your SD card instead of your device's internal storage. But what about your existing downloads? Don't worry! Apple Music will offer to move your current library to the SD card as well.
This feature might seem promising at first, but it doesn't work quite the way you’d expect. Apple Music for Android doesn’t let you change the default download location, and you can't simply browse to the folder and move the files. Even though the app's cached data can take up a lot of space, the downloaded audio files remain hidden. Why? Because they're not stored in a way that makes them easily accessible or usable outside the app.
The downloaded Apple Music files are saved in protected M4P format and can only be recognized and played by the Apple Music app. That's why there are so many restrictions on how these songs can be used. If your Android device is rooted, you can technically find the cache files on your phone. But accessing them doesn't do much. These files are still encrypted and unusable elsewhere.
That's where the tool introduced in Part 2 comes in. It allows you to download actual, playable Apple Music tracks that can be freely transferred to any device, whether Android, iOS, or beyond.
Part 2: How to Download & Transfer Apple Music to SD Card? (For All Devices)
As mentioned earlier, Apple Music songs downloaded to your SD card can't be played on devices that don't support the Apple Music app or iTunes. That’s because Apple allows downloads only for offline playback within its ecosystem. The files are protected by FairPlay DRM. In addition, the downloaded songs are tied to your Apple Music subscription and device authorization. Once your membership expires or if your device isn’t authorized, the downloads become unplayable. To truly save Apple Music to SD card for flexible use, you’ll first need to remove the DRM protection and convert the songs to an open format like MP3.
TunePat Apple Music Converter is a powerful and user-friendly tool designed to help you do exactly that. It lets you download original-quality Apple Music tracks and convert them into widely supported formats such as MP3, AAC, FLAC, WAV, AIFF, and ALAC. The software supports batch conversion and can operate at speeds up to 10X faster, making it both efficient and accessible, even for beginners. In the next section, we’ll walk you through the exact steps to use it.

TunePat Apple Music Converter
2.1: Convert and Download Apple Music to Computer
Note: To use this method, you'll need to have an active Apple Music account. If you're new to Apple Music, here are 12 methods to get Apple Music for free, up to 6 months!
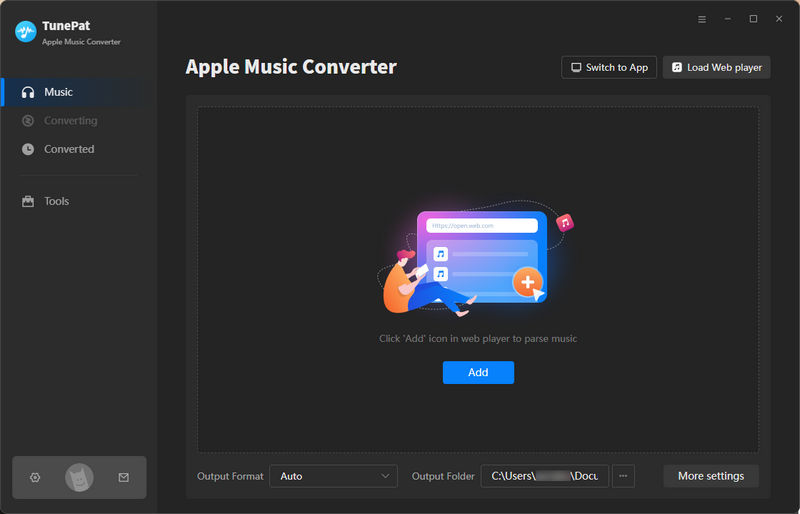
Step 1 Download and Launch TunePat
Start by downloading and installing TunePat Apple Music Converter on your computer. When you launch the program, you'll see its main interface. TunePat offers two conversion modes: one via the Apple Music web player and the other via the iTunes (or Music) app.
For faster conversion, we recommend using the Apple Music web player. However, if you're on a Mac and want lossless audio, you can also choose to convert directly from the Music app, and please note that this may be slower. In this guide, we’ll use the web player as an example to demonstrate how to convert Apple Music to MP3 for later transfer to an SD card.
Step 2 Configure Output Settings
Before selecting an Apple Music song, album, or playlist to download, go to the "Settings" module to complete the output settings. Choose the output format that suits your needs. If you're planning to transfer the files to an SD card, we generally recommend selecting "MP3" as it's widely supported.
You can also customize other preferences, such as output quality, output file name, output folder, and other parameters. Once you've finished configuring the settings, simply close the pop-up window to save your changes.

Step 3 Select Songs from Apple Music
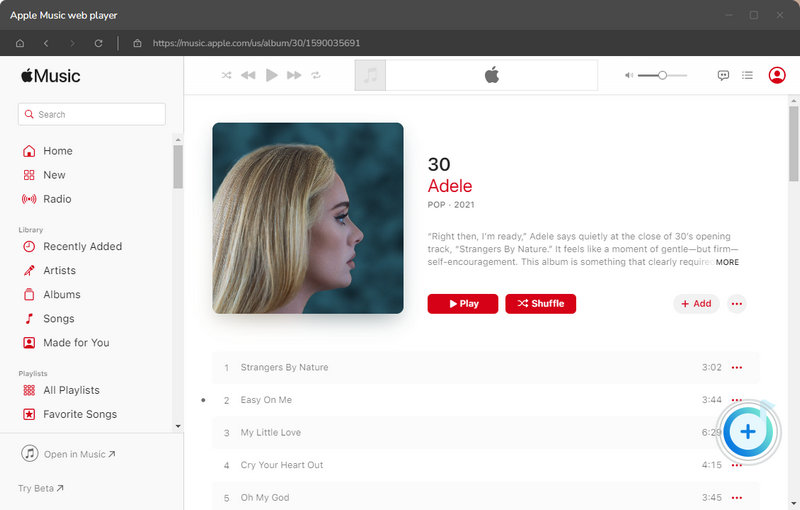
Log in to your Apple Music account within the built-in web player. Then, open the song, album, or playlist you want to convert. Once it's loaded, the "+" button in the bottom right corner will turn blue. Click it, and TunePat will automatically scan and display the available tracks in a pop-up window.
By default, all tracks are selected. If there are any songs you don't want to convert, simply uncheck them. When ready, click "Add" to proceed.

Step 4 Convert Apple Music to MP3
Click the "Convert" button, and TunePat will begin downloading the selected Apple Music tracks in MP3 format.
TunePat supports batch conversion. If you'd like to add more songs before converting, click "Add More" to repeat the selection process. Once all your desired songs are added, click "Convert" again to download them all at once.

Step 5 Locate and Transfer Your Apple Music Files
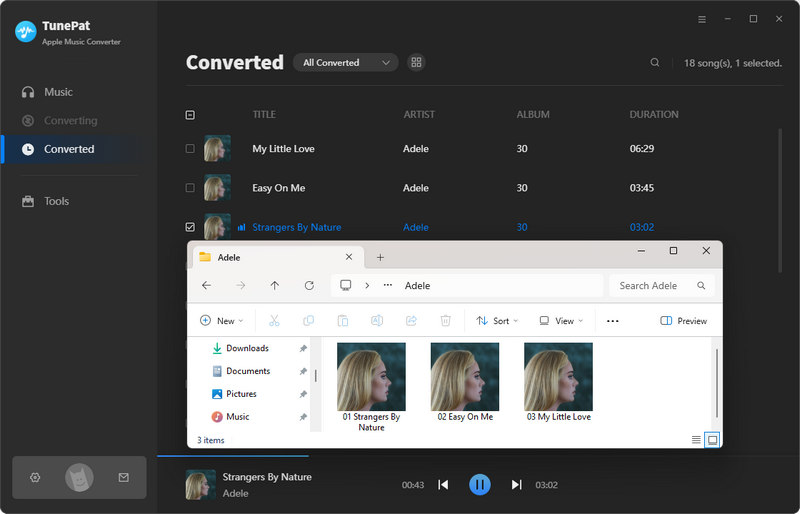
After the conversion is complete, go to the "History" tab to view all downloaded songs. You can also double-click a track to play it directly.
Your converted Apple Music files are now saved as standard MP3s in the output folder you selected earlier. From here, you can easily transfer them to your SD card for playback on any compatible device.
2.2: Transfer the Downloaded Apple Music to SD Card (Android or iPhone)
Please visit the output folder you have just set up. Alternatively, click on the Folder (Show in Windows Explorer) icon to the right of any converted song in the History panel to jump directly to the output folder. Then, please find all the songs you have just converted in the output folder. Then begin the steps to complete the song transfer.
For Android Users:
Step 1 Connect the SD card to your computer via a card reader.
Step 2 Create a folder named Music, then copy your local songs into it.
Step 3 Remove the card and insert it into your Android phone.
Step 4 The phone will scan for new media, and your songs will appear in music apps.
For iPhone Users (with computer of macOS Catalina and later):
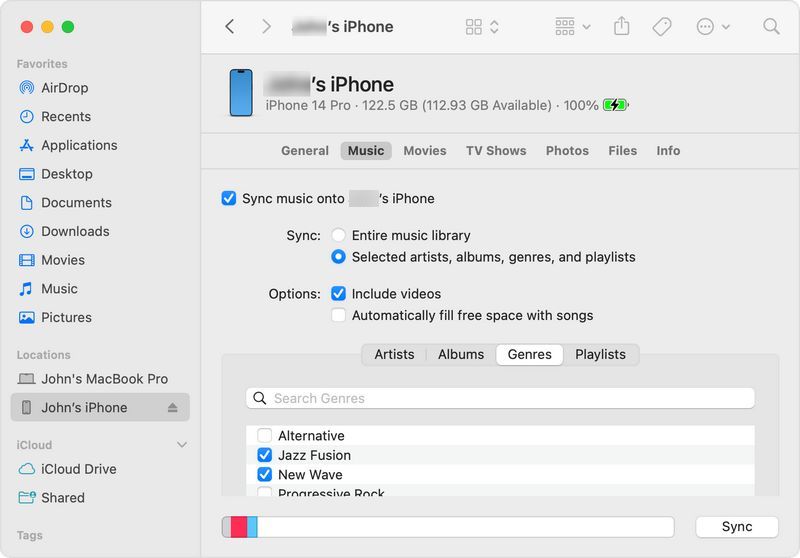
Step 1 Connect your iPhone to your Mac using a USB cable.
Step 2 Open Finder and select your iPhone under Locations. Then, go to the "Music" tab.
Step 3 Check "Sync music onto [Your iPhone]", then choose to sync your entire library or selected items. You can drag music from your local folders into your Apple Music library if needed. Click "Apply" or "Sync".
Conclusion
To sum up, both methods enable Android users to save Apple Music to SD card. However, if you want a more flexible and lasting solution that ensures the Apple Music songs can be played on any device, we strongly recommend using TunePat Apple Music Converter. This option lets you permanently keep your Apple Music files and transfer them to an Premiere Pro, CapCut, and various other devices or platforms.


Delilah Rene
Senior Writer